Despite my lack of blogging, my interest in WPF remains. Over the last few years, I have worked in hardware companies, writing Windows applications that control devices. Since devices often have proprietary device drivers, the applications cannot be sandboxed. Thus, newer technologies are not options. WPF still feels like a good place to be stuck working, though, and I sense some increased interest in it lately, so maybe it will be alive for years to come, particularly for close-to-the-metal types of applications.
Archive for the ‘WPF’ Category
Visual Tree, Logical Tree, and *Ownership* Tree
Posted: April 14, 2010 in .NET, Architecture, C#, Quality, Windows Presentation Foundation, WPFTags: .NET, Architecture, C#, Quality, Windows Presentation Foundation, WPF
Most WPF developers know about the visual and logical trees of WPF. For example, a StackPanel with a Button may be made up of a StackPanel, Button, a ButtonChrome, a ContentPresenter, and a TextBlock. That’s the actual visual tree, but the logical tree is simply a StackPanel with a Button.
If you only specify your visuals in XAML, you may be overlooking another important control hierarchy. Consider this XAML:
<TabControl>
<TabItem Header=”Tab 1″>
<TextBlock Text=”This is on Tab 1″ />
</TabItem>
<TabItem Header=”Tab 2″>
<TextBlock Text=”This is on Tab 2″ />
</TabItem>
</TabControl>
The hierarchy shows that a TabControl has two TabItem controls, each with a TextBlock. This implies that the TabControl owns the TabItem controls, and each TabItem owns a TextBlock. Consider this code:
TabControl myTabControl = new TabControl();
TabItem myTabItem1 = new TabItem();
TabItem myTabItem2 = new TabItem();
TextBlock myTextBlock1 = new TextBlock() { Text = “This is on Tab 1” };
TextBlock myTextBlock2 = new TextBlock() { Text = “This is on Tab 2” };
myTabItem1.Content = myTextBlock1;
myTabItem2.Content = myTextBlock2;
myTabControl.Items.Add(myTabItem1);
myTabControl.Items.Add(myTabItem2);
Notice how flat the code looks when compared to the XAML. In the code, the same object that has a reference to the TabControl has a reference to each TabItem and TextBlock.
Imagine that you need to change the text on the TextBlock that is on Tab 2. With the XAML, you would need to walk the visual or logical trees to get a reference to the object. With the code, you already have a reference to all of the objects without walking any trees. You can simple write
myTextBlock2.Text = “New text for Tab 2”;
We really have three trees in WPF: the visual tree, the logical tree, and the ownership tree. With the code above, all of the controls have the same owner. If the owning object were a dialog, for example, the dialog may have references to every item on it. Therefore, it does not need to walk the visual or logical trees to get to its controls. The ownership tree is therefore flatter than the visual and logical trees.
I have seen developers spend unnecessary effort trying to make their business logic match the visual hierarchy of the controls. I would argue that this is counter-productive. Just because a dialog’s visual hierarchy has, say, ten levels does not mean that the business logic must have ten levels.
The business logic is mostly independent of the control-layout logic. It may not be entirely independent. For example, the dialog may not expose references to its controls to the outside world. Therefore, whoever owns the dialog does not own the controls on the dialog (unless they are intentionally exposed through a public API). Thus, the ownership hierarchy has a dialog at one level and all of the controls at a second level.
I thus recommend thinking in terms of three WPF trees: the visual tree, the logical tree, and the ownership tree.
Please feel free to comment with your own experiences.
Thanks,
Dale
Compiling an Application in Silverlight *or* WPF
Posted: March 31, 2010 in .NET, Architecture, C#, Quality, Silverlight, Windows Presentation Foundation, WPFTags: .NET, Architecture, C#, Silverlight, Windows Presentation Foundation, WPF
I like to build abstraction layers over Windows to insulate my applications from the low-level details of the operating system. For example, instead of writing code like
System.Windows.Window window = new System.Windows.Window();
I would instead make my own Window class, which for this example, I’ll call ZWindow. Now the code looks like this:
ZWindow window = new ZWindow();
The ZWindow class will in turn likely create a System.Windows.Window window, which is a WPF window. However, on Silverlight, it might instead create a System.Windows.Controls.Grid since Silverlight does not have a System.Windows.Window class. Thus, the ZWindow constructor might have code like this:
#if SILVERLIGHT
System.Windows.Controls.Grid grid =
new System.Windows.Controls.Grid();
#else
System.Windows.Window window =
new System.Windows.Window();
#endif
If you write an application that uses a ZWindow class, you need not care about the difference between WPF and Silverlight.
After experimenting with various ways of organizing my abstraction layer’s projects and solutions in Visual Studio to accomplish this shared codebase between WPF and Silverlight, I have settled on the following approach:
- You cannot mix WPF and Silverlight within the same Visual Studio project. Thus, you need two projects that share the same source files.
- Do not think of one project as the primary and the other as the secondary. Treat them equally.
- Put your shared source files in a folder of their own—not in the same folder as any Visual Studio project files.
- In your two Visual Studio projects (one for WPF and one for Silverlight), link to all of the source files that need to be shared. Thus, you’ll have three folders total—one for the shared source files with no projects, one for the WPF project file with no source files, and one for the Silverlight project file with no source files. (NOTE: In Visual Studio, to link to source files without it automatically copying them to your project’s folder, select “Add Existing Item,” and then instead of clicking the Add button to dismiss the dialog, click the little down arrow on the right side of the Add button and choose Add as Link.)
- Create one Visual Studio solution for WPF and another for Silverlight. Do NOT try to cross compile within the same Visual Studio solution. While technically sound, I do not recommend it due to solution clutter. The projects in each solution will look the same, but will be specific to WPF or Silverlight.
- Create additional solutions for any applications that need to be compiled with the abstraction layer for either WPF or Silverlight. Do not combine application-specific projects with framework types of projects.
Thus, instead of this:
Folders with shared files:
Project 1 Shared Files
Project 2 Shared Files
Cluttered Solution:
Project 1 WPF
Project 1 Silverlight
Project 1 Smartphone
Project 2 WPF
Project 2 Silverlight
Project 2 Smartphone
Try this:
Folders with shared files:
Project 1 Shared Files
Project 2 Shared Files
WPF Solution:
Project 1 WPF
Project 2 WPF
Silverlight Solution:
Project 1 Silverlight
Project 2 Silverlight
Smartphone Solution:
Project 1 Smartphone
Project 2 Smartphone
In my experience, as projects get larger, the second approach scales more elegantly.
Please feel free to provide feedback for this blog entry and to share your own experiences with multi-platform development.
Thanks,
Dale
Customizing WPF TextBox Not Easy, But Possible
Posted: September 25, 2009 in .NET, C#, Performance, Windows Presentation Foundation, WPFTags: .NET, C#, Performance, Windows Presentation Foundation, WPF
For several days, I looked for hooks into the Windows Presentation Foundation (WPF) System.Windows.Controls.TextBox control to display shadowed text:
WPF does not make the shadow effect easy. Changing the Foreground property can change the text color to any brush (even to a video or an image brush), but it does not achieve the shadow effect.
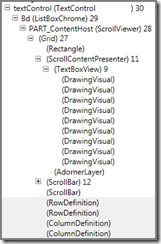
Using Snoop, I looked at the visual composition of a TextBox:
The TextBoxView control shown in Snoop does not have a public API. Lester Lobo says in this WPF forum post, “It is an internal lightweight class handling the rendering of content in the textbox.” If you re-templated a TextBox to try to replace the TextBoxView, you would have to implement all of the text-management functions provided by a TextBox—no small undertaking.
I then found a blog entry by Ken Johnson on CodeProject.com describing a clever hack for tricking a TextBox into doing what I wanted. His article is called CodeBox 2, and it uses the following algorithm:
- Derive a class from TextBox.
- Set the Foreground property to Brushes.Transparent. This hides the TextBox’s built-in text rendering.
- Override OnRender().
- Create a FormattedText object with the TextBox.Text string and set some properties to make it align and wrap just like the TextBoxView would normally do.
- Call DrawingContext.DrawText() to output the FormattedText such that it draws in the exact same position as the TextBoxView would normally do. To achieve the shadowed text effect, first use DrawingContext.DrawText() to draw the shadow offset a couple of units from the primary text, and then call it again to draw the primary text.
- What you now see is your shadowed text in a fully-functional TextBox. If you highlight text, you are actually interacting with the transparent text that is drawn in the TextBox.
It may be a hack, but it’s a clever hack, and aside from some scrolling and margin adjustments described well in Ken Johnson’s article and code, you can implement it relatively painlessly.
WPF’s in-depth text formatting features pay a price in CPU performance. This custom TextBox pays an even bigger price. First, drawing transparent text likely goes through all the formatting and rendering steps for no obvious visual effect. The text formatting likely provides some hit-testing and/or control sizing (layout) features even when formatting invisible text. Second, in addition to drawing transparent text, constructing a new FormattedText object and calling DrawingContext.DrawText() twice (once for the shadow and once for the primary text) adds overhead.
While I have not tested performance of my shadowed-text custom TextBox as shown in the screenshots above, I imagine that it will perform well enough on mid-level computers even with large amounts of text. However, if your application used these shadowed text effects in many places, the accumulation of CPU overhead would likely add up to significant performance problems.
I would appreciate any comments about other ways to draw shadowed text in a TextBox or to gain hooks into TextBox’s inner workings.
Good luck!
Dale


